How to merge books and title variants
Use this guide when the same book appears on more than one row—for example, as an ebook, paperback, hardcover, audiobook, or a listing imported from another platform.
Publisher Champ merges these rows by giving them the same Title Alias. Their royalties and expenses can then be shown together throughout Publisher Champ.
- Merging only groups titles inside Publisher Champ. It does not change your Amazon, KDP, Shopify, or other platform listings.
- It does not delete or combine the original rows or their data.
- The Title Alias becomes the name shown for the group on pages such as Dashboard and Book Stats.
Before you start
- Decide which rows really represent the same book.
- Choose one group name, such as
The Lighthouse Mystery. - Use that exact same alias for every row in the group. Capitalization, spaces, and punctuation must match.
Use the bulk method below whenever you have two or more rows to group. It is faster and reduces typing mistakes.
Recommended: merge two or more titles at once
1. Open Bookshelf and choose All variants
Go to the Bookshelf & BSRs page. In View catalogue as, select All variants so every format and platform listing has its own row.
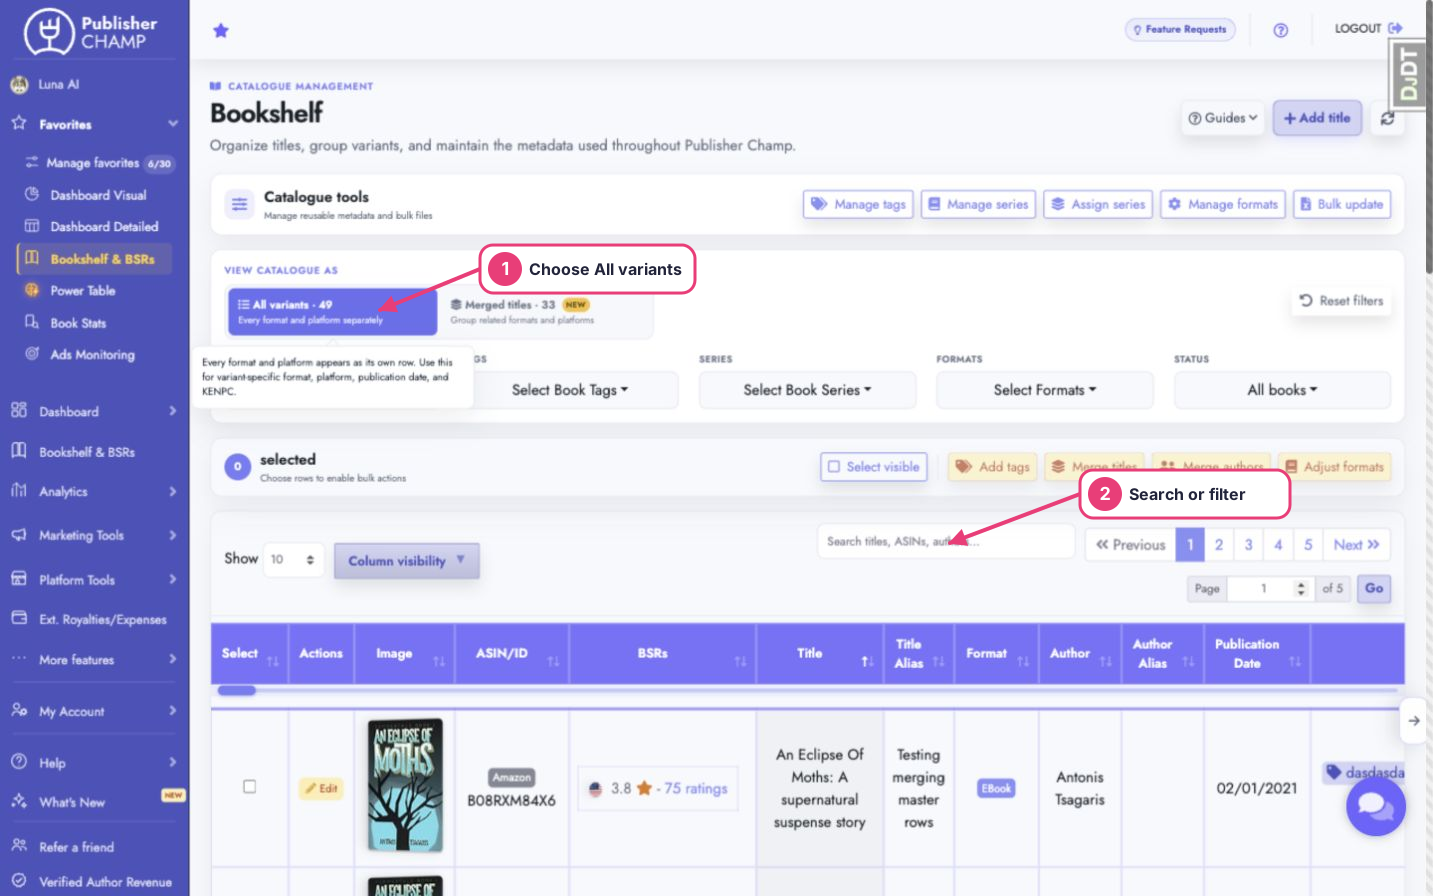
Use All variants for this job. It lets you see and select each individual ebook, paperback, hardcover, audiobook, or platform listing.
2. Find only the titles you want to merge
Use the search box or the Author, Tags, Series, Format, and Status filters to narrow the table. Before selecting anything, compare the Title, ASIN/ID, Format, and Platform values.
If two books merely have similar names but are different works, do not merge them.
3. Select every row that belongs in the group
- Tick the checkbox at the far left of each correct row; or
- Click Select visible only when every row currently visible in the table belongs in the same group.
Check the selected counter before continuing. The Merge titles button becomes available after at least two rows are selected.
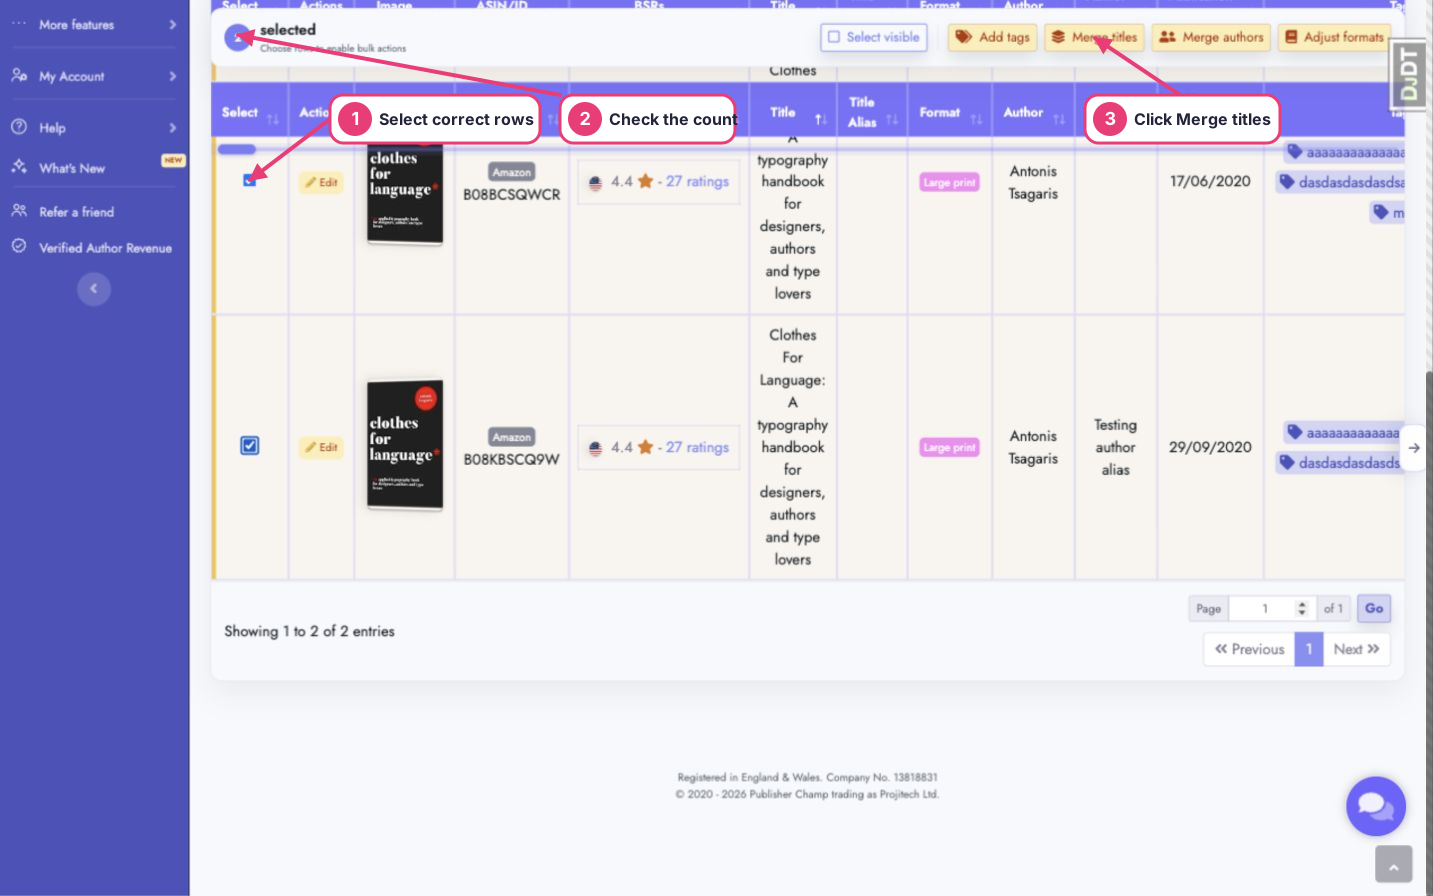
Select visible selects the rows currently shown in the table. If the search or filters are too broad, an unrelated book can be included. The selected counter should equal the number of variants you intend to merge.
4. Click Merge titles
The Merge Titles window lists the selected books. Read that list once more and make sure every title belongs in the same group.
5. Enter one Title Alias
In Title alias for merging, type the name that should represent the whole group—for example, The Lighthouse Mystery.
- To join an existing group, select its existing alias from the suggestions instead of retyping it.
- Keep the optional Series and Cover image choices turned off unless you intentionally want to apply the same series details or cover to every selected title.
- Do not use format words such as “ebook” or “paperback” in the alias unless you truly want separate groups.
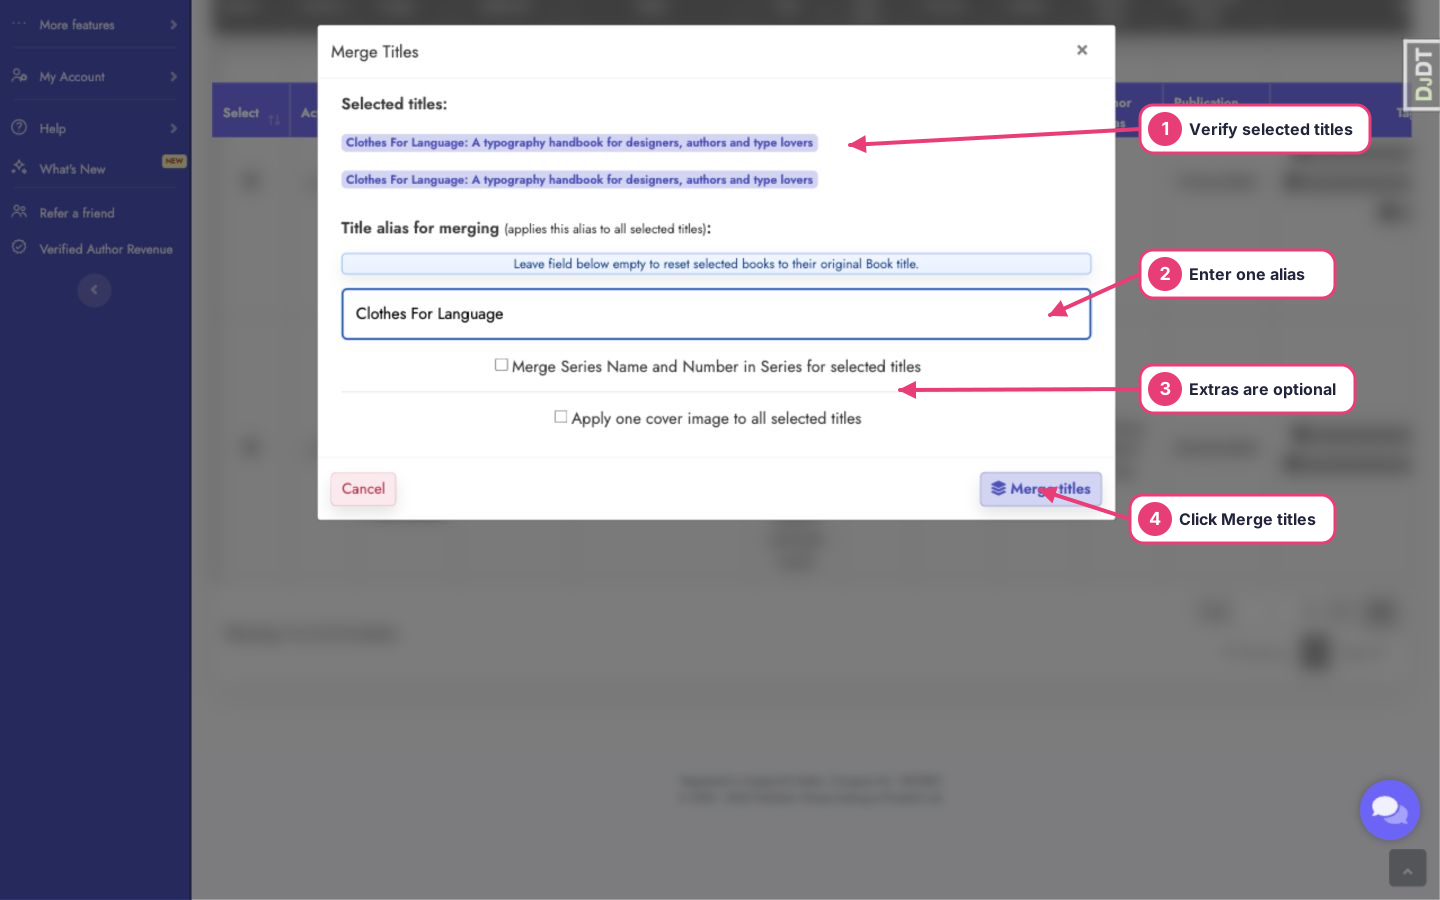
6. Click Merge titles and wait for confirmation
Do not close or refresh the page while the merge is being saved. A success message confirms that the selected rows now share the alias.
7. Verify the result
Switch to Merged titles. The group should appear as one main row with a Variants count. Expand Variants to confirm that every expected format and platform row is present.
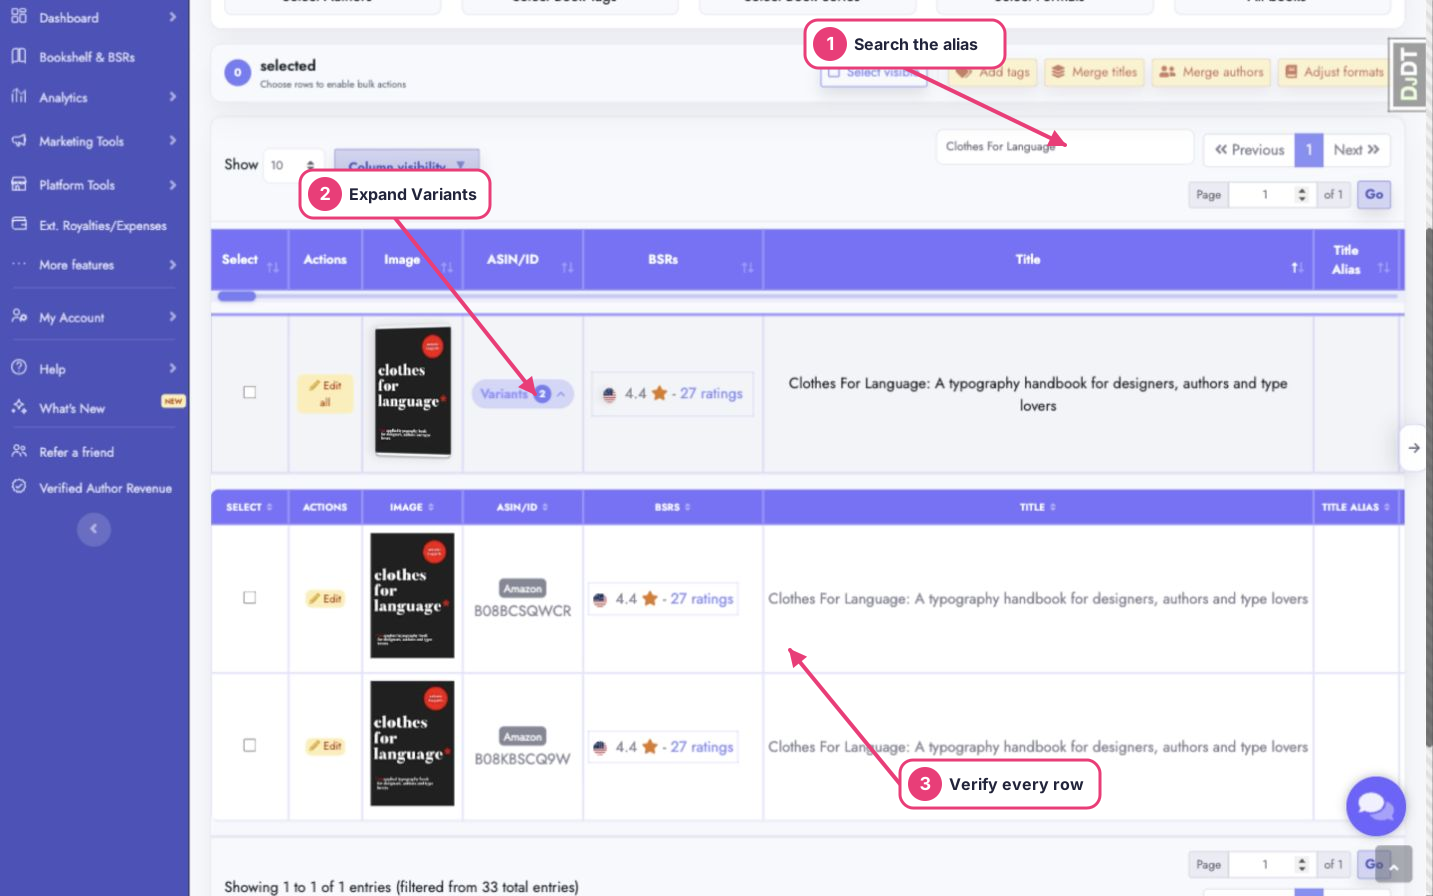
You can also open Dashboard or Book Stats and search for the Title Alias. The grouped royalties and expenses should appear under that alias.
Alternative: merge titles one at a time
Use this method when you prefer to edit each row separately.
- Open Bookshelf and select All variants.
- Find the first row and click its yellow Edit button.
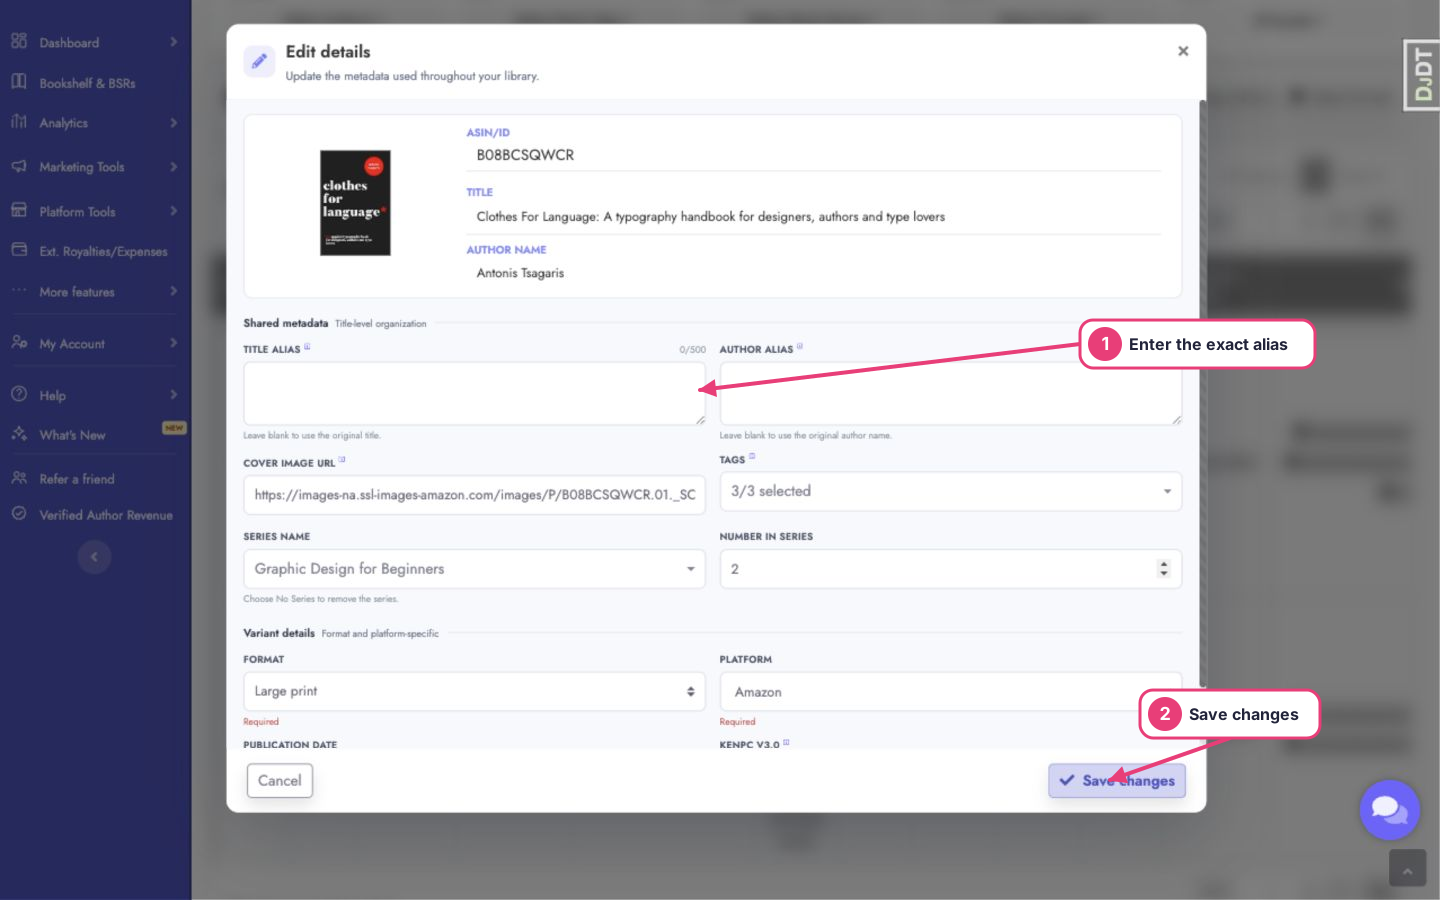
- In the Edit Details window, enter the chosen name in Title Alias.
- Click Save at the bottom of the window.
- Repeat for every other row that belongs in the group.
- Copy and paste the alias each time so every character is identical.
These aliases create three different groups:
The Lighthouse Mysterythe lighthouse mysteryThe Lighthouse Mystery - Paperback
To create one group, use exactly The Lighthouse Mystery on every variant.
Fix or undo a merge
Remove one title from a group
- Switch to All variants.
- Click Edit on the row that does not belong.
- Delete everything in Title Alias.
- Click Save. The row will use its original book title again.
Reset several titles at once
- In All variants, select the rows you want to reset.
- Click Merge titles.
- Leave Title alias for merging completely empty.
- Click Merge titles. The selected rows return to their original book titles.
Move titles into a different group
Select the affected rows and repeat the bulk process using the correct existing alias or a new alias. The new value replaces the previous alias on those rows.
Troubleshooting
The Merge titles button is disabled
- Make sure you selected at least two rows.
- Use All variants, where each listing can be selected separately.
- If you use shared account access, select one account for which you have Full Access.
The titles still appear as separate groups
- Compare the aliases character by character.
- Check capitalization, punctuation, apostrophes, and extra spaces.
- Edit the incorrect row or bulk-apply the correct existing alias again.
An unrelated title was merged by mistake
Switch to All variants, edit that row, and either clear its Title Alias or give it the correct alias. No royalty or expense data is deleted.
Some formats are missing from the merged group
Clear the Bookshelf filters, search by the book title or ASIN/ID, and check whether the missing row has a different alias. Apply the exact group alias to that row.